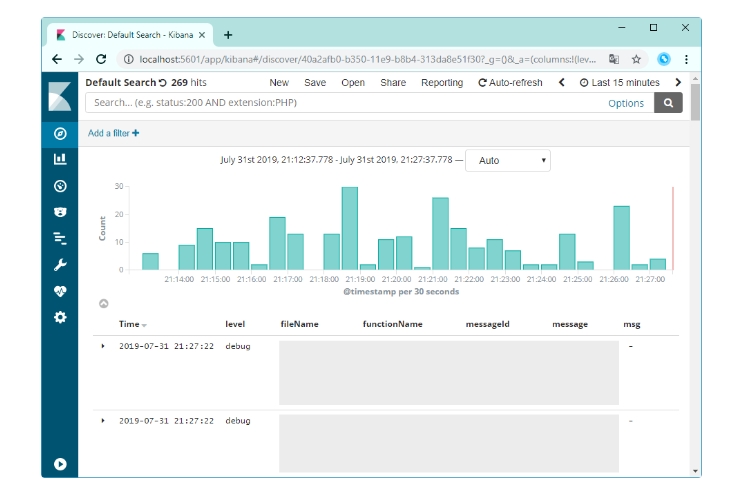
Project staging environment logs are difficult to search, plan to build EFK management logs, but EFK memory consumption is too large, and then add a new cloud server is not cost-effective, intend to build in the local (16G memory).
什么是 EFK
EFK is not a piece of software, but a set of solutions, and all of them are open source software, which ELasticsearch Responsible for log keeping and searching.FileBeat Responsible for collecting logs.Kibana Responsible for the interface.
- 1. Elasticsearch Elasticsearch is an open sourcedistributed search engine, provides three main functions of collecting, analysing and storing data. Its features include : distributed , zero configuration , auto discovery , indexing automatic slicing , index replica mechanism , restful style interface , multiple data sources , automatic search load and so on.
- 2. FileBeat Filebeat is part of the BeatsThe log data is collected and uploaded to the
Elasticsearch, andLogstash, andRedisand other platforms. - 3. Kibana Kibana provides a user-friendly web interface for log analysis that helps to aggregate, analyse and search important data logs.
Environmental status
- 1. The local environment:Windows 10Intel(R) Core(TM) i5-7500 CPU with 16G of RAM.
- 2. Remote environment: SUSE Linux Enterprise Server 11, less than 1G of available memory
- 3. I can start a VM locally, but I can't afford to buy additional cloud servers.
initial idea
There are currently 3 ways of thinking about this:
- 1. Elasticsearch, Kibana, and Filebeat are started locally, the server starts FTP and maps to a local network drive, and Filebeat is configured to read logs from the network drive.
- 2. Start Elasticsearch and Kibana locally, use the reverse proxy tool FRP to expose Elasticsearch port 9200 to the public network (pay attention to the configuration of forensics), and start Filebeat remotely to output to the local Elasticsearch.
- 3. Start Elasticsearch, Kibana, and Logstash locally, and Filebeat and Redis remotely; Filebeat outputs to Redis remotely, and Logstash locally reads from Redis and forwards to Elasticsearch.
Programme identification
There is resistance to all three of these options:
- 1. Unstable mapping, frequent disconnections, and too slow I/O speeds
- 2. Reverse proxy tools cannot be used in companies
- 3. More complex configuration
A sleep produced option 4: 4. Start Elasticsearch, Kibana, and Filebeat locally, loop the rsync command, SSH to the server and incrementally sync the log locally, and the local Filebeat can read it without a hitch!
fuss
Elasticsearch, Kibana due to high resource consumption, decided to start under Windows environment rsync due to Linux, can only be started under virtual Ubuntu Filebeat due to logging under Ubuntu, for I/O efficiency, also started under Ubuntu
Activate E & K
Installing Kibana
https://www.elastic.co/guide/en/kibana/current/windows.html
Installing Elasticsearch
https://www.elastic.co/guide/en/elasticsearch/reference/current/getting-started-install.html
Please refer to the official installation documentation for installation. The configuration used in this tutorial is as follows:
network.host: [_local_, _site_]
http.port: 9200
server.port: 5601
server.host: "0.0.0.0"
elasticsearch.url: "http://localhost:9200"Start the virtual machine
Here we use Vagrant to boot, install Virtualbox and Vagrant, and create a Vagrantfile as follows
Vagrant.configure("2") do |config|
  config.vm.box = "ubuntu/xenial64"
  config.vm.provider "virtualbox" do |vb|
    vb.memory = "8192"
  do |vb| vb.memory = "8192
do |vb| vb.memory = "8192" end
Execute in the same directory vagrant upand then vagrant ssh Connect to the virtual machine.
Start Filebeat
Install Filebeat
curl -L -O https://artifacts.elastic.co/downloads/beats/filebeat/filebeat-6.3.2-amd64.deb
sudo dpkg -i filebeat-6.3.2-amd64.deb
Configuring Filebeat
sudo vim /etc/filebeat/filebeat.ymlThis is the configuration of common, please configure the appropriate plugin according to your own project's log format. 10.0.2.2 Represents the host, if you are using Virtualbox + Vagrant as well, don't change it.
filebeat.inputs.
- type: log
  enabled: true
  paths.
    - /home/vagrant/logs/*
filebeat.config.modules: path: ${path.config}/modules.d/*.yml
  path: ${path.config}/modules.d/*.yml
  reload.enabled: false
setup.template.settings: index.number_of_shards
  index.number_of_shards: 3
setup.kibana.
  host: "10.0.2.2:5601"
setup.template.name: "filebeat"
setup.template.pattern: "filebeat-*"
setup.template.pattern: "filebeat-*" output.elasticsearch.
  hosts: ["10.0.2.2:9200"]
  index: "filebeat-%{+yyyy.MM.dd}"
Make sure you have started Elasticsearch and Kibana earlier, and then start Filebeat.sudo service filebeat start
Incremental synchronisation of logs from server side
Firstly the server must have ssh_key login enabled, under Ubuntu generate the ssh configuration to the server's authorized_keys Middle.
carry out byobuThis opens a terminal session where commands will not be terminated if the terminal exits.
| (computer) shortcut key | corresponds English -ity, -ism, -ization |
| F2 | Create a new window |
| F3 | Switch to previous window |
| F4 | Switch to previous window |
| F7 | Browse the history of printing information for the current window |
| F6 | Let byobu go backstage. |
| Ctrl + F6 | Close the current window |
Modify the following command and execute to achieve incremental synchronisation:
while true;do rsync -rtv --include "**.log" --exclude "*. *" --append -e "ssh -p " @:/var/logs /home/vagrant;sleep 5;done;This is a long command, so an explanation of the command is given:
- 1.
while truecyclic execution - 2.
-rtvr for recursive directories, t for retaining the modification time of the files to be synchronised, and v for verbose mode, which outputs more information about the synchronisation (you can -vv for more verbose mode) - 3.
--include "**.log" --exclude "*. *"Synchronise log files only - 4.
--appendIncremental synchronisation, which compares file sizes and only synchronises the excess - 5.
-e "ssh -p "Custom SSH program command line, custom ports - 6.
/var/logs /home/vagrantSynchronise the /var/logs directory on the server to the local /home/vagrant directory. - 7.
sleep 5Synchronisation rests for 5 seconds at the end of each session to avoid excessive use of server bandwidth.
Interested kids can learn more about the usage of the rsync command here: https://www.cnblogs.com/f-ck-need-u/p/7221713.html
sprinkle flowers
Press F6 to cut the loop to the background, wait for a while and then visit http://localhost:5601/ to see if you can query the log.

If there is a large amount of historical logs, a large number of logs will be processed after the first startup, and it is normal to check out a large number of logs in a short period of time.

